Setup and Enter Inventory in QuickBooks
Call us for instant help – We are available 24*7

Quickbooks provides a feature to track and set up inventory for the Pro, premier, and enterprise users. It is somehow a very monotonous task but is one the most crucial task that you have to perform. You need to keep a track of your inventory to provide enough resources to your customers or the vendors. It helps you to keep track of your sales and purchase, assets and much more thins. It gives you a clear picture of your stock.
It should be noted that when you install the Quickbooks version on your system, you are not provided with the inventory feature. You are required to activate it for your account and then you can add products to it. In this article, we are going to explain to you how you can activate the QuickBooks inventory on your system and how you can enter an inventory in QuickBooks.
What Is Inventory In QuickBooks?
Inventory is the most essential asset that a business holds. In QuickBooks, Inventory is the stock that companies hold for resale. With an inventory system, you can ensure a high end management way through which you can handle your business more precisely.
With this system, you can know what is left to get and what has been delivered by your company. Hence, it is a revolutionary feature of the most amazing accounting software.
Steps to Activate the Inventory
Before going into details about how to enter inventory in QuickBooks enterprise, were going to discuss how can you activate inventory with your Quickbooks software. Follow the steps listed below.
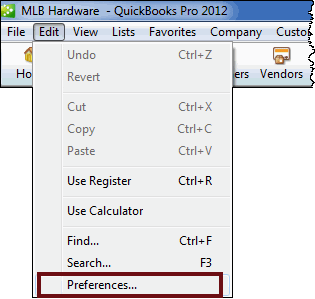
- The first step is to start the QuickBooks software and then go to the edit option.

- There you will be able to see an option for the preferences. Click on the option.
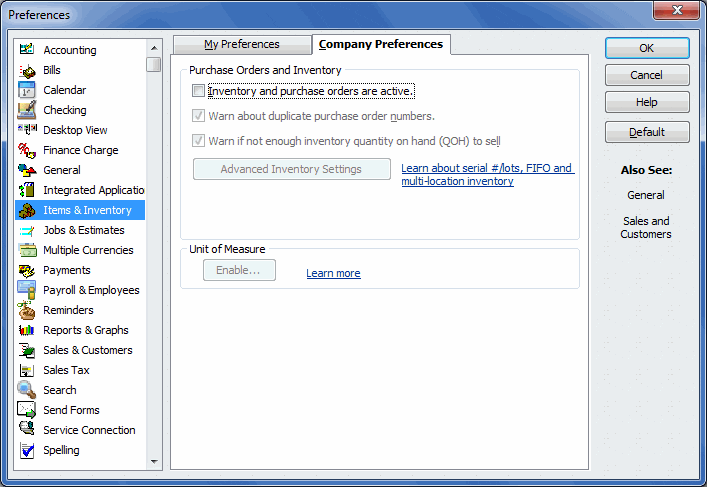
- After this, You will have to go to the inventory option and then go to the company preference option.

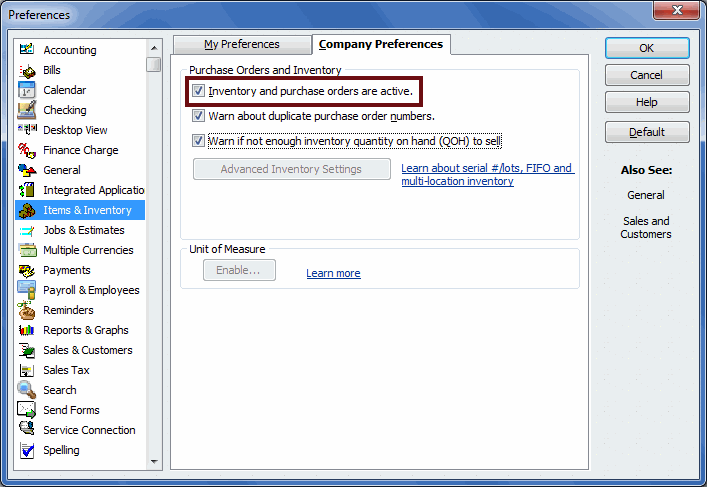
- Make sure that the inventory option is enabled. If it is not, enable it.

- After this, you will have to save your settings and close the window.

- Once done, check again if the inventory option is enabled or not. If not, make sure you repeat the process and check if you missed any step.
Read more - How to use & Fix Issues with QuickBooks Refresher Tool?Steps to Add an Item
Now that you have activated the inventory feature on your system, the next step is to add the items in it. You will have to follow the process mentioned below:
- First, you will have to go to the services option on QuickBooks home.
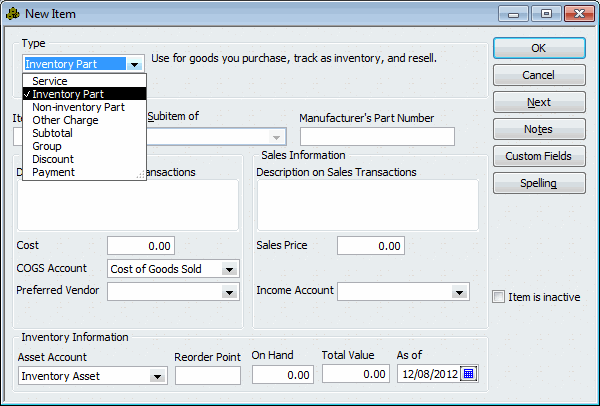
- After this, you will have to go to the list of items and then choose to add a new item.
- It will redirect to another window and you will have to choose for the inventory part in the menu.

- Next, you will have to fill up the information that is asked from you.
- Make sure you fill-up the correct information.
- Next, it will ask you to enter the details of the account through which you are going to track your inventory. Make sure you enter the correct details of the account asked from you.
- The next step is to fill all the other information that is asked from you to fill up.
- Once you are done, recheck all the details that you have filled and then save the details.
- Check the items that you have added.
Read Also - How to optimize QuickBooks Speed?Steps to Check Inventory in QuickBooks Online
Enable the Inventory Tracking Feature
- First, in the QuickBooks online home page, click on the option for settings and after that go to the accounts options.
- Then click on the option for sale.
- After this, you will be needed to select the edit option and enable the services or products option.
- Once done, You are required to make the necessary changes.
- Select the price option if you want to provide the biddable prices and if not, let it be.
- The next thing is to enable the feature for tracking the inventory.
Adding the Products in the Inventory
Once you have enabled the tracking feature, the next thing is to add the products in your inventory. For this, you will have to enter the products for which you want to enable the tracking feature and you will also have to add the list of products that you going to buy or you will sell.
Keep Track of Products that you Sold
The next thing that you have to do is to keep a track of all the products you are selling. This will help you to take an estimate of your income and take a clear picture of all the stocks that are present. It will help you to maintain your financial activities.
Reestablish your Inventory
Once you are getting out of stock for any product, you are needed to restock it. keep a check on your stock. One of the best features of the QuickBooks is that it will help you with restocking by telling you when you should restock. You can know all the details of the products that you have bought and the products that are left for the purchase.
Conclusion
We hope that the process to add an inventory is now clear to you. We have tried our best to keep it simple for you to understand. In case you still do not get how to enter inventory in QuickBooks, you can consult our QuickBooks support team for assistance.


