

Does your QuickBooks abruptly stop and show up with the error 80070057? Well, QuickBooks is such an amazing accounting software that has so many capabilities to handle anyone’s business efficiently, but it certainly comes with some errors, and this error may make you furious as it ends all the ongoing activities in just a second. If you are facing this too, then don’t worry we are here to help you.
In this article, we are going to discuss all the occurrence reasons along with its symptoms that will help you to understand the nature of QuickBooks Error Code 80070057. When you understand the reasons, half of the problems are solved there. We will also provide you with quick and easy troubleshooting methods that you can easily apply and get rid of the QuickBooks error 80070057.
What is QuickBooks Error Code 80070057?
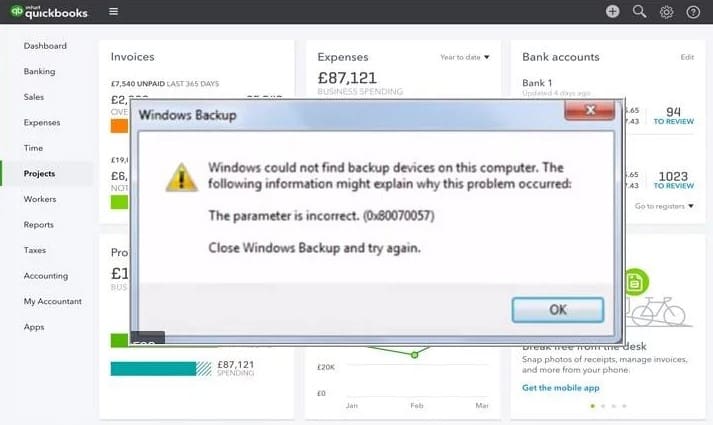
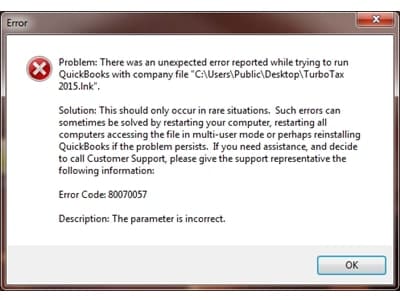
QuickBooks Error Code 80070057 is an error that occurs when you are trying to open your company file. The major reason behind the occurrence of this error is a communication gap between the file & server or host network. There is a lot of interruption in the communication. Another reason is that the company file is created with an earlier version of QuickBooks and you are trying to open it on the newer version. Due to this error, you don’t have full authority to do anything with the files. And that is a very big issue and you will get frustrated at some point.
Causes Behind QuickBooks Error Code 80070057
There is not any certain reason why a user is facing the QuickBooks error code 80070057, but we can list some of the possible reasons. Read the list below to know the cause for getting the QuickBooks error 80070057.
- There are chances that the settings of your firewall are causing your system to crash.
- The other possible reason is the damaged network file in the QuickBooks.
- In case you have the wrong extensions for your file, you are going to face the error.
- If you have not configured the settings of your antivirus or any other firewall system, then you are going to face this error.
- In case your QuickBooks installation file is damaged or corrupted, it will lead to this error.
Symptoms that Indicate QuickBooks Error Code 80070057
Before applying the fixation methods meant for error code 80070057, confirm the error by considering the below symptoms:
- If the system freezes while launching the company file.
- Error code appearing as “Parameter is incorrect”.
- When launching the company file, QuickBooks starts crashing.
- You can’t delete your company files.
- Sluggish input devices performance.
- Your company files face sudden collapse.
Methods to Fix QuickBooks Error Code 80070057
Here is a list of all the methods that you can use to eliminate the QuickBooks error code 80070057. You can opt for any method that works for you.
1. Update QuickBooks
The first recommended solution is to Update QuickBooks software on your system. You can do so by downloading a new version from the official website or you can use the current QuickBooks to update. Follow the steps listed below:-
- If you want to update the QuickBooks using the currently installed version, you are required to visit the help section.
- In the help section, you will find an option to update the QuickBooks. Click on the same.
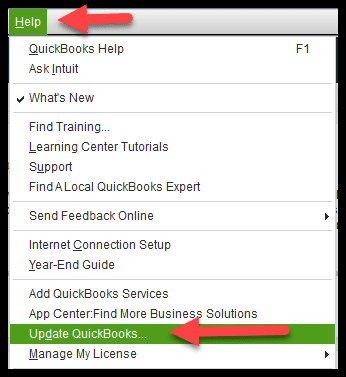
- You will be required to reset the update and it will update the QuickBooks.
- You can even opt for an option to automatically update QuickBooks in the future.
- The next step is to change the extension of the updated folder.
- You will be required to create a folder.
- Next, copy and paste the company file from the original folder to the new folder and then change the extension of the folder to .qbm
- After this, you will be required to open the file in the QuickBooks software. In case, you are facing any error while opening the file, you can change the extension of the folder.
2. Clean Install QuickBooks
The next recommended method is to perform a clean install on your system. You will be first required to uninstall the software from your system and then install it on your system again. We recommend this solution because it will help you to eradicate the glitches that the software might have.

3. Restore Your Company File to its Default Location
A relocated company file can create trouble in loading and show an incorrect parameter error. Hence, restore your QuickBooks backup file to the default location using these steps:
- First, reach your current company file’s location.
- Then, right-tap your file and choose “Copy”.
- After that, launch “My-Computer”.
- Next, launch “C: drive” and start navigating these folders:
– Users
– Public
– Public Documents
– Intuit
– QuickBooks
– Company Files
- Now, press CTRL+V keys simultaneously.
- After that, launch “QuickBooks”.
- Then, select “Find company file”.
- Finally, choose your company file.
4. Rename the Network Data (.ND) File
A corrupt network data file causes QuickBooks to malfunction and results in this error. Fortunately, users can fix the corruption by renaming the .ND file. Here’s how:
- Reach your QB company file directory.
- Then, locate the network data file having “.ND” extension.
- Next, right-tap the data file and click Rename.
- Now, add “.abc” to the end and press “Enter”.
Now repeat the steps that were causing QuickBooks error 80070057 to appear and ensure if it’s resolved.
5. Configure Firewall to Allow QuickBooks
QuickBooks requires firewall authorization to function properly. Hence, configure the Firewall to allow QuickBooks. Follow these:
- First, press “Windows” + “R”.
- Next, input “Control Panel”.
- Then, hit “Enter” and navigate “Firewall-Settings”.
- Now, click “Allow-Programs” and include “QuickBooks”.
- Finally, click “Ok” and run a reboot.
6. Use the QuickBooks Database Server Manager
The next recommended step is to scan your files again with the QuickBooks Database Server Manager to eradicate the errors. Follow the steps listed below:-
- First, you will need to find the database server manager on your system.
- Then, you will have to add a sample folder and then go to the browse option to find the folder where your file is present.
- Once found, you will have to add the company file.
- After this, you will have to start scanning the files.
- Once the scan is done, you will have to open your company file again.

7. Use QuickBooks Software as an Admin
The next recommended solution is to access QuickBooks as an admin. Follow the steps mentioned below:-
- The first step is to run the QuickBooks software as an administrator.

- The next step is to open the file. If you do not get it opened automatically, you will be required to open it manually.
- Once done, you are required to check if you are getting the same error or not. If yes, try another method.
8. Using QuickBooks File Doctor
Error code 80070057 in QuickBooks often relates to issues with accessing the company file. Using QuickBooks File Doctor can be a helpful step to resolve this error. Here’s a guide on how to use QuickBooks File Doctor to fix error 80070057:
- Download and Install QuickBooks File Doctor from the official Intuit website.
- Open the Tool Hub and go to the “Company File Issues” tab.
- In the Tool Hub, choose “Run QuickBooks File Doctor.“
- Select the company file from the drop-down menu or browse to find it.
- Choose the option “Check your file” and then click “Continue.”
- Enter the QuickBooks admin password when prompted.
- Wait for the repair process to complete. Open the company file again and check if the resolution has been done.
Read Also: QBDBMGRN not running on this computer
Conclusion
We believe that after following all the methods that have been mentioned above you will not face any issues while fixing the QuickBooks error code 8070057. All the possible methods have been discussed in detail to help you with the issue. In case the error persists, you can reach our expert team and they will guide you on how to fix the QuickBooks error 80070057.