

QuickBooks is an accounting pro software. Out of several different features it offers, one is online banking. Whatever we perform via online banking, we need a record of it. In order to download these transactions, we need a CSV file. A CSV file is used to import online banking transactions into QuickBooks application. In this article, we’ll discuss CSV files and how you can import CSV into QuickBooks. This blog will guide you step by step to import transactions into QuickBooks desktop from CSV. You’ll get to see different aspects of this file and much more. Stick till the end if you want to learn all about importing transactions into QuickBooks desktop from CSV.
What is a CSV File?
You can explain CSV as a complete text-based file that contains data in a tabular format. Each section is separated from commas and a CSV can be edited via notepad. QuickBooks uses CSV file to import transactions into QuickBooks desktop from online banking in order to keep a record of those transactions.
Comma separated values file being in a tabular format does not mean the actual table. However, it means that different sections are separated with commas, as already mentioned above. For instance, how will a CSV file store name, email, phone number, address. This is how: xyz, xyz@xyz.com, 0001110001, address
Such files can be opened in any editor that can edit text. Be it word, notepad, excel etc.
Why Import CSV Into QuickBooks?
You need to maintain records of all the data in order to track finances. The CSV file is already in tabular format and it is supported by spreadsheets. In the case of online banking, there are so many QuickBooks transactions and it will be time-consuming and can be inaccurate to record each one manually. The concept to import CSV to QuickBooks is to eliminate the chances of errors due to inaccuracy and to save tons of effort and time.
CSV short for “comma separated values” can be imported into QuickBooks which in turn can be recorded into other spreadsheets applications. QuickBooks import CSV file with different transactions, journal entries, etc.
Steps To Import CSV Into QuickBooks
Step 1: Download QuickBooks Plugin
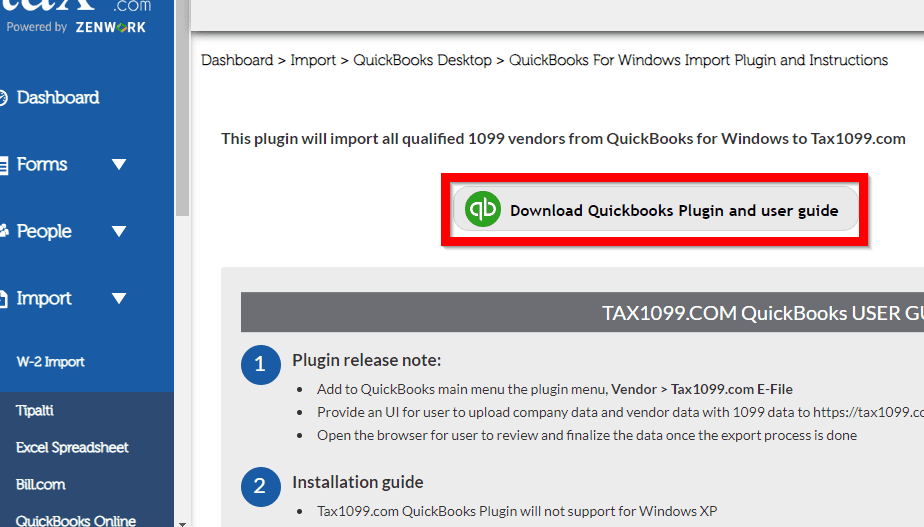
Before you start to import CSV QuickBooks, you’ll need to download a plugin. The plugin you need to download is QuickBooks import excel and CSV toolkit.
This QuickBooks import excel and CSV toolkit contains information that helps you with CSV files and others too. It explains what details are available in excel and QuickBooks import CSV. Here’s what you’ll find in this toolkit:
Import manual
This is an excel and CSV import manual containing different notes, pointers, instructions on excel and CSV files.
CSV examples folder
This folder will store samples of CSV file ( four samples). Each sample will be based on different types of CSV files found.
XLS example folder
In this specific folder, there will be four different worksheets each belonging to different types of lists that you can find in any typical excel file.
Allowed fields
Allowed fields provide a better understanding of what different sections are found in import CSV to QuickBooks and excel.
Step 2: Install QuickBooks Import CSV And Excel Toolkit
- Go to the downloaded toolkit file.
- Double-click on it and save it at the local location of your choice.
- Next, open .exe QuickBooks and import CSV and excel file.
- Open the WinZipSelf-Extractor window.
- Select the option to launch import excel and import CSV into the QuickBooks folder, available in the same location as the toolkit.
Step 3: Import CSV File
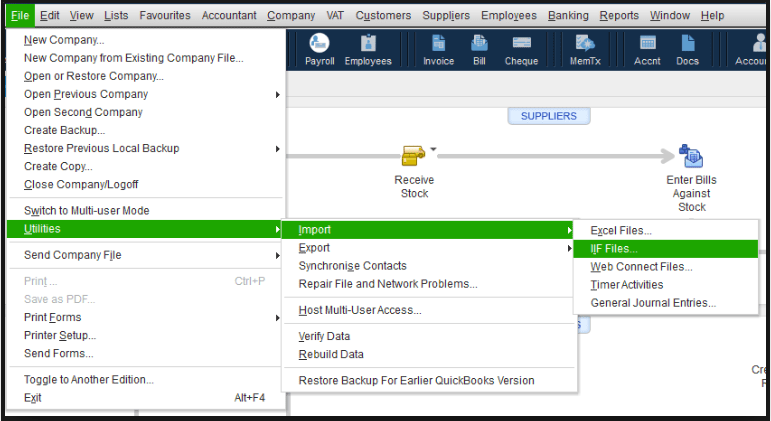
- Open QuickBooks and go to the banking tab.
- You can either select the update drop-down menu or upload transactions manually.
- If you select the latter, you’ll need to manually enter all the entries and transactions.
- On selecting the former, go to the file upload tab next.
- Here, click on browse and go to the location of the CSV file.
- Hit next.
- Now in your QuickBooks account, you’ll need to select an account to import CSV to QuickBooks.
- Tap next and then mark the fields to match the data with the imported file.
- Again tap on next.
- Opt for import CSV into QuickBooks file.
- Hit next > yes > finish.
- The process to import transactions into QuickBooks desktop from CSV will be successful.
Pointers for Exporting CSV from QuickBooks

Till now we have learned how to import CSV into QuickBooks in a stepwise guide. Now once you import transactions into QuickBooks desktop from CSV, you need to learn steps to export the same. But what is the need?
There can be scenarios when you do not have excel and hence you will need to export CSV files to another software. You’ll either export different accounts separately or the entire file together. First, let’s look at different accounts separately exporting:
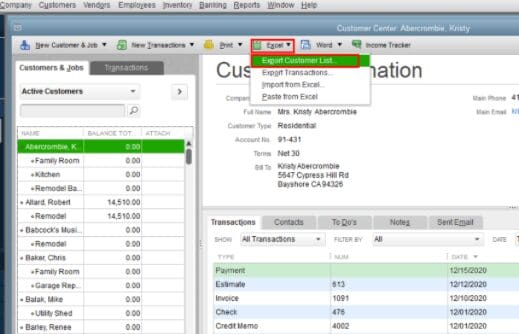
Exporting Customer/Vendor:
- Open customer/vendor center.
- Click on excel to open the drop-down list.
- Open export vendor/customer list.
- Set the filter for exporting transactions.
- Now, tap on export transactions.
- An export window will open up, you’ll have to choose .csv file.
- Finally hit the export button followed by stating the file name and location.
Reporting Items:
- Open lists menu.
- Tap on excel drop down > export all items.
- The export window will appear, choose .csv file.
- Finally hit the export button followed by stating file name and location.
Exporting Reports:
- Open the report menu.
- Tap on excel drop-down> create a new worksheet.
- The export window will be visible.
- Locate .csv file and click on it.
- Finally hit the export button followed by stating the file name and location.
Final Say
Comma-separated values file, i.e. CSV file is a text-based file in a tabular format. Where different sections are separated by commas, therefore name. This file is supported by most spreadsheets and therefore you can import CSV into QuickBooks. Importing excel and import CSV into QuickBooks serves the purpose of recording online banking transactions.
You can also enter the transactions manually, but it will be time-consuming and require a lot of effort. Moreover, it does not guarantee accuracy. Although each and every step to import CSV into QuickBooks is mentioned in this guide, you might still face difficulties.
In such cases, you can contact our customer support team and they’ll clear out your doubts. The QuickBooks customer support team is available twenty-four hours at your service. All you have to do is ping us and we’ll contact you as soon as we can.
Frequently Asked Questions
Q1: What Types of Transactions I can Import CSV Files into QuickBooks?
A: You can do 3-column or 4-column format transactions while importing CSV into QuickBooks. QuickBooks can only handle these types of formats in the same order.
Q2: What Types of Lists I can Import CSV Files into QuickBooks?
- Customer
- Vendor
- Items
- Reports
- Chart of Accounts
Q3: How to import CSV bank transactions into QuickBooks desktop?
- Log in to the Chart of Accounts.
- Open any report here.
- Now select excel drop-down.
- Tap on create a new worksheet.
- Select .csv file.
- Hit export and choose the desired location and name for the file.