Reclassify Transactions in QuickBooks- Accountant's tool
Call us for instant help – We are available 24*7

QuickBooks application is becoming popular among the accounts industry and is employed by mostly every small-sized company. QuickBooks comes up with a lot of tools which is beneficial in accounting activities. One such tool is the reclassify tool in QuickBooks. It is one of the beneficial tools provided by the QuickBooks software. You can use the QuickBooks reclassify tool to classify the transactions which will help you to keep track of the transactions for tax purposes. You are needed to employ the tool and it will find the transactions that you have linked to the wrong account or under the wrong class. In this article, we are going to talk about how you can reclassify transactions in QuickBooks. We have mentioned different steps that can help you to reclassify transactions in QuickBooks online as well as on QuickBooks desktop.
What is reclassify transactions in QuickBooks?
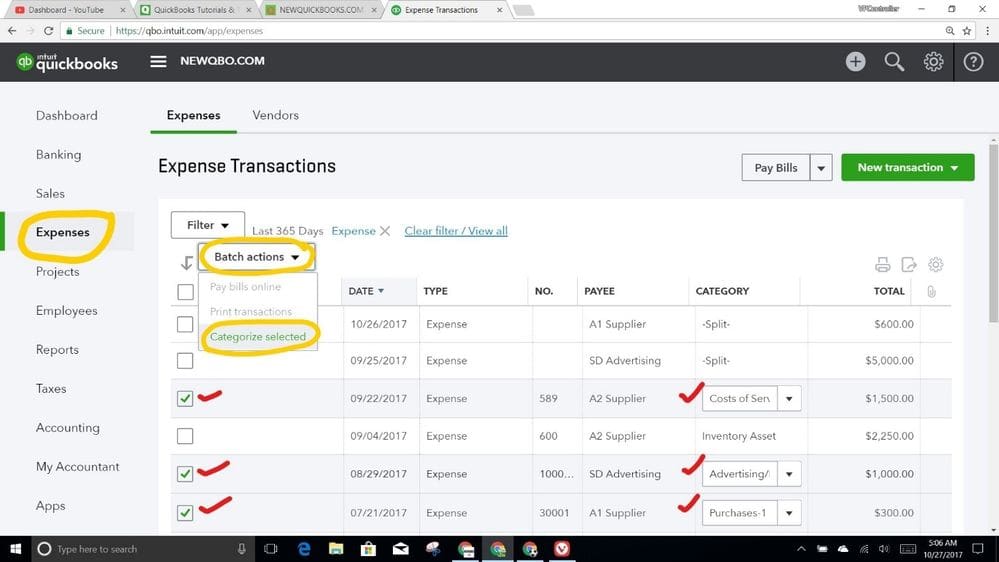
Reclassify transaction tool is a tool that helps to classify transactions in QuickBooks without wasting time. We know that classifying account transactions can be difficult to perform as one would need to classify all of them one by one, and that is too time taking. With reclassify tool, you can not only reclassify the transactions, but you can save your time and energy by classifying them one by one.List of Fixed Transactions
If you want to reclassify the transactions and move them to another location, you are needed to keep in mind the following transactions won’t be able to move after reclassifying.
- You are needed to remember that you won’t be able to change the account for the invoices, and memos.
- Other than this, you can not change the account for the expense.
- After this, you can not change class and the account for inventory.
- You can also change the account for billable expenses but you won’t b able to change the income account which is related to the income transaction.
- In case you wish to change your payroll transactions, you will be needed to go to the payroll menu.
The process to Reclassify Transactions in QuickBooks Desktop
Here is a stepwise that you need to follow to reclassify the transactions. The process consists of three steps and we have mentioned all the steps in detail.
Choose Fiscal Year
The first step in the process is to select the year for which you want to reclassify the transactions. Follow the steps mentioned below.
- The first step is to go to the accountant option and then click on the client data option.
- Now, you will have to select the range of dates for which you want the best review. You will have to select the date under the date range option.

- Once done, you will be required to click on the accrual or the cash option.
- After this, you will be needed to select the modify option.
- Now, you will be needed to click on the reclassify transaction account option, and then from the status dropdown menu, you will be needed to click on the in-progress option.
- Last, you are needed to close the file.
Review Transactions
The next step in the process is to review the transactions. Follow the steps mentioned below.

- You are again needed to go to the accountant option and then click on the client data option.
- After that, you will be needed to click on the reclassify transaction option.
- Now, you will see the accounts option, and then in the dropdown menu, you will be needed to select the view option.
- After this, you will be needed to select the type of account and after that choose the account for which you want to see the transactions.
- After that, you will be needed to go to that transaction and then you will be needed to click on the name option.
- After this, you will have to click on the show transaction option and then check the list of transactions.
Reclassify the Transactions
The last step in the list is to reclassify the transactions. Follow the steps mentioned below.
- First, you are needed to choose the transaction option and then click on the select all option.
- After this, you will have to mark the account as the option.
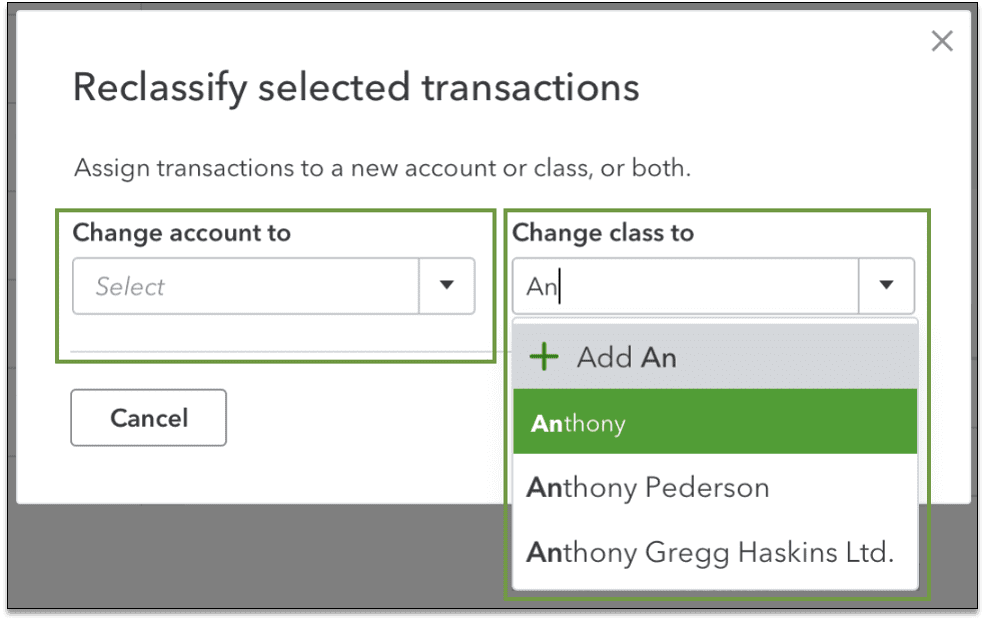
- After this, you will have to click on the account option, and then from the dropdown menu, you will be needed to click on the name of the account to which you want to move the transaction.

- You can also classify the transactions according to the class. For this, you will be needed to click on the class to option.
- After this, you will have to select the class from the dropdown menu and then click on the reclassify option.
The Process to Reclassify Transactions in QuickBooks Online
You can reclassify the transaction in QBO in two ways. The first one is by profit and loss and the other one is by location. We are going to discuss the whole process of reclassification of transactions in both ways separately.1. Through Running the Profit and Loss
Here we have listed the steps that will help you to reclassify the transaction via running the P & L.- First and foremost, you need to open the QBO company of the client.
- Now, choose the accountant tools followed by choosing the reclassify transactions.
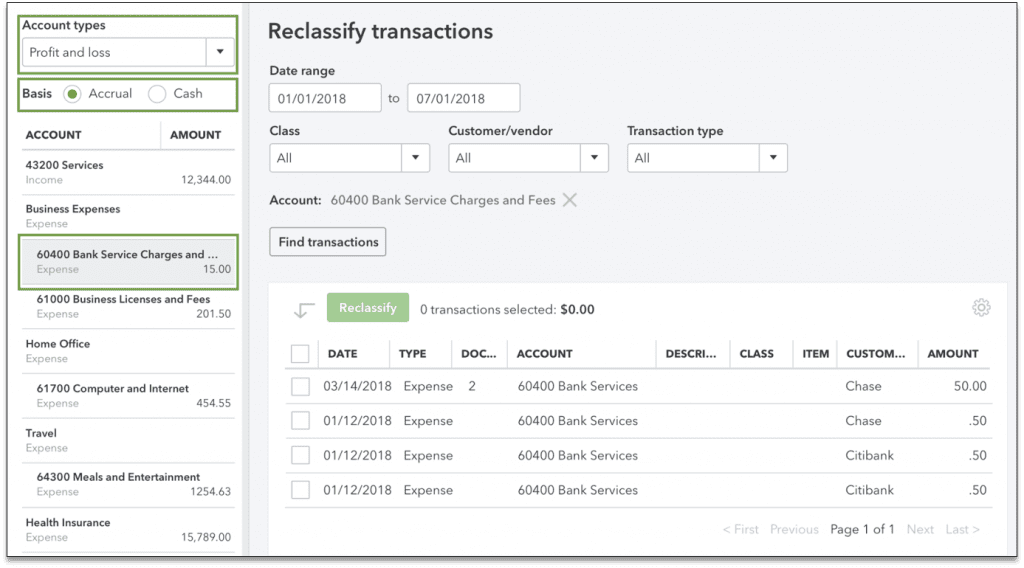
- Then, choose the P and L under the section of account type to see your income & expenditure. You can also choose the balance sheet to view your assets, equity, and liabilities a/c.
- After that, you have to select the account from the list of accounts in which you want to edit or change. Filter this list by using the different filtration options modify, customer, class, and type.
- In case you want to view all paid & unpaid transactions, choose the option accrual, otherwise select the option cash to see the paid transaction only.
- Once done, select the option Find Transactions.
- Moving ahead, tick each box in which you want modifications.
- Thereafter, single-click on the option Reclassify.
- Further, you need to make a new account to relocate the transactions.
- Lastly, click on the option Appy to complete the process.
2. Through the Locations
You need to follow the below-listed steps in order to reclassify the transactions with the help of locations.- To start with, you must open the client’s QBs Online company.
- Then, Choose the account & settings under the option settings.
- After that, single-click on the Advanced tab.
- Moving forward, you must choose the edit choice under the categories choices.
- Lastly, switch on the track locations and single-click on the save button.
Wrapping Up!
Reclassifying transactions in QuickBooks can help you to manage the transactions in a better way. You may experience different QuickBooks error codes. We hope that the steps we have mentioned will help you to reclassify the transactions in QuickBooks. As it is mentioned, it is a simple process to reclassify the transactions in QuickBooks consisting of a few steps. We have tried to explain to you with detailed procedure for reclassifying transactions in QuickBooks. Our team will help you to resolve the issues by contacting us that you are facing or any concerns that you have.


