

QuickBooks, over the past years, has seen a consistent data migration from QuickBooks desktop to online. Considering the same, Intuit has recently launched a new tool called QuickBooks migration tool that helps you transfer QuickBooks data from one device to another and especially from QuickBooks desktop to online.
This online tool makes the whole QuickBooks migration super easy and users using QuickBooks 2015 and earlier versions can also use the QuickBooks desktop migration tool. Moreover, since the tool is operated on the cloud, users with low RAM and space can also use it until they have a good internet connection and a browser.
QuickBooks online migration tool may seem very fascinating to users but at the same time, those who are new to the tool can have some difficulty in using it. To help you with the same, we have come up with this comprehensive guide to explain to you everything about QuickBooks desktop to the online migration tool.
What Is QuickBooks Migration Tool?
QBO migration tool helps you transfer data from QuickBooks desktop to online, premier to pro, and vice versa. If you are using a specific version of QuickBooks and you decide to switch to another version that seems more convenient, the QuickBooks migrator tool will be of great help.
Currently, two versions of the migration tool of QuickBooks are available, where:
- The first version allows the user to transfer data from QuickBooks Pro, Premier, and Mac to QuickBooks online. Also, users operating QuickBooks version 2015 and older can transfer data using this tool.
- Another version of the QuickBooks migration tool is available for QuickBooks enterprise.
The QuickBooks migrator tool is accessible through the internet and browsers. So, as long as you have a stable internet connection and an updated browser, you are good to go. However, QuickBooks desktop migration to online or vice versa are two different processes. Here, in this post, we have explained both in detail.
Requirements To Use QuickBooks Migration Tool
Here, we’ve listed a few items to think about while moving QuickBooks to a new computer:
- In order to store your QuickBooks data, you must have a USB flash drive with enough empty space.
- Your new computer needs to be connected to the Internet.
- It also provides information regarding the required quantity of space. It typically ranges from 150 to 250 MB.
Read More - How to Install and Setup QuickBooks Trial Version?
Prerequisites To Perform QuickBooks Desktop Migration
Before you use the QuickBooks migration tool, here are certain actions you have to perform to ensure a smooth migration process.

- Recheck all the chart of account balances. Make sure that the balance is accurate and updated.
- Undertake all the credit card statements and bank reconciliations.
- In case any open transactions are present, ensure to categorize them.
- Make sure you have a precise balance sheet along with the current tax return.
- There should be no outstanding invoices present.
- If any payroll tax payments or runs are available, make sure you complete them before migrating.
Steps To Set Up QuickBooks Migration Tool

Before we proceed with the data transfer using the QuickBooks migration tool, we need to download and install QuickBooks on one system.
Now, let us envision some steps in downloading, installing, and setting up this tool in the system. So some of the steps are as follows:
- Log into Quickbooks using the correct credentials that is, your accurate admin ID and password.
- Once you have successfully logged in, permit to access it so the data can be easily copied into the system.
- After this, move towards the migration tool and hit on it.
- Once you click, it will ask for your password. So, to begin with enter the admin password.
- After entering the password, tap on the run icon or start button once you enter the tool.
- Furthermore, the migration tool will start to execute and begin to work.
- After this, when the tool begins to work, the lash drive starts copying and transferring precisely the same file.
- One thing must be kept in mind: once the data is transferred successfully, your data will never be formatted or erased, but the data will remain the same as it used to be in the past. On the other hand, if you are willing to delete it, you can do so by clicking on the delete option.
Data that can be transferred using the QuickBooks migration tool
Herein, a list of data has been presented, which defines the data that could be easily transferred using this tool. Thus, the list is as follows:
- The details on the Quickbooks desktop, such as information on the version or some other details, are needed to install the QB desktop onto the new system.
- The file includes the last three company files opened on the old system, including the sample company files.
- Quickbooks custom templates, forms, and letters.
- Spelling checker (UserDictionary.tlx and spell.ini)
- The setting of the printer (wpr.ini, QBPrint.qbp, and PrintEng.ini)
- Finance statement designer (FSD clients)
- A business planner (.bpw)
- An advanced report (for the QB enterprise)
- The cash flow projector (.cfp)
- The statement writer (for QB accountant)
- Financial statement designer (FSD data)
- Memorized and scheduled reports
- The local attachments
- QB loan manager
Data that can’t be transferred using the QuickBooks migration tool
Some specific data couldn’t be transferred while you are using the Quickbooks migration tool. Thus, it includes the following:
- In a multi-user setup, the configuration would not be copied into the new system if Quickbooks is being used.
- Also, if the payment and payroll system has been set up, the user must sign up for the new system again. This is because the new system can help protect the data.
- Intuit Data Protect must be removed from the old computer before the user logs in and completes the setup on the new one. All of the earlier backups will remain accessible.
- We won’t copy any company files that you haven’t used recently. As previously stated, QuickBooks copies only three of the most recent company files accessed. You can manually transfer or restore the remaining files via Intuit Data Protect.
- Also, remember that the Migration tool will not copy any manual backups you have previously made.
Steps to move data using QuickBooks Desktop Migration Tool
To ensure that the data is transferred without loss, simply follow these steps for using a migration tool to move QB data from the old system to entirely the new one:
On the old computer: The process to be followed
Following the launch of your old system, you can do the following actions:
- On the old system, connect the USB flash drive.
- Next, open the Quickbooks desktop.
- Then, moving ahead, move toward the file menu and tap on it.
- Now you can see the drop-down list of file menu; just scroll down it and click on the Utilities option.
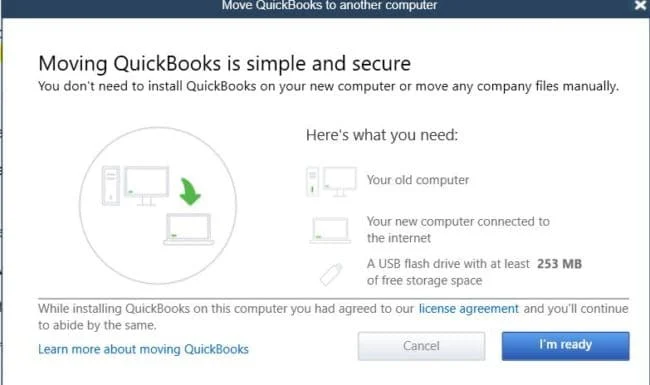
- Once you click on the Utilities option window, you will see an option called “Move Quickbooks to another computer.” Click on it.
- While moving ahead, tap the ‘I am ready’ option and create a unique password after this.
- While proceeding, follow all the online instructions and choose your USB flash drive.
- Now, at last, you have to keep patience and hold till the tile all the files are being copied.
On the new computer: The process to be followed

You must now start your new system after you have finished copying the files:
- You must first connect your flash drive to the new system.
- Make sure the tool won’t start up on its own.
- In your newly installed system, open the flash drive.
- The Move_QuickBooks.bat file should be double-clicked.
- Enter the password you made in the old system now.
- You must now wait until the Migration Tool completes its task after completing the procedures mentioned earlier.
Additional requirements to complete the QuickBooks setup

Some additional steps need to be undertaken, as we all know that the data can’t be copied with the help of the migration tool. So some of the steps are as follows:
- First, you need to log in to the payment or payroll services.
- After this, sign in to Intuit Data Protection.
- Once this step is over, your entire backup schedule must be configured.
- The backup of the company file must be taken precautionary so that unexpected issues or concerns can be avoided.
Steps such that the data could be transferred manually
Although it may seem complicated, a few simple procedures can help you manually copy the data to the new system. You must follow these procedures to move the data manually.
- First, you must create a QuickBooks backup on your old computer.
- Next, the Quickbooks must be uninstalled from the old system after the first step.
- Next, after uninstalling this, move towards the new system and install it on your new computer.
- Finally, you must restore the QuickBooks backup you created on your old computer to your new system.
Steps after migration of QuickBooks desktop
Once the QuickBooks data has been migrated to the new computer, the following procedures must be followed:
- You must first log into your payment and payroll services.
- Now, create a backup schedule and log into Insight Data Protect.
- Any additional company files can now be easily transferred from the old system to the new one.
- Ensure you always have a backup of your company’s files.
Easy method to migrate data to QuickBooks online
The steps are listed as follows to migrate data to QBO, such as:
- First, choose the plan.
- Next, log in for Quickbooks online essentials.
- Once this is done, the complete data must be uploaded into the system.
- The conversation form provided by Intuit must be completed.
- Next, the backup of your data must be uploaded.
- After uploading it, the data needs to be migrated.
- Then, finally, tap the review icon.
Conclusion
With the QuickBooks Migration tool, the article above will assist you in transferring your QuickBooks data between systems. However, errors occasionally cause chaos and interfere with your work. Therefore, if you need assistance with your work or run into trouble utilizing the Quickbooks migration tool, you may call us directly by calling the QuickBooks support team at +1-844-214-9614. The professionals would be pleased to offer advice and respond to any queries.