

Sometimes you might find it difficult to rectify any error which is coming in QuickBooks and get hyper that how I will deal with this issue. One such error is QuickBooks Error 15223 or maintenance release error. But no need to get hyper as we are here for you to make it simple. This error appears during the process when of downloading the QBs Desktop or while updating your Payroll in QuickBooks.
So, while you were downloading you got stuck with the error message stating “Error 15223: The QuickBooks Desktop update did not complete successfully”. Likewise, while updating Payroll it will also show an error message “Error 15223: Cannot connect to QuickBooks Desktop Payroll”.
You don’t need to worry because we are going to provide you with the causes, symptoms, and best corrective methods to overcome QuickBooks maintenance release error 15223. If you stick around until the very end of the article, we’ll give you all the answers you need. So, let’s begin.
Possible Causes of QuickBooks Error 15223
Here are the causes that led to QuickBooks error code 15223 appearing while you were using QuickBooks:
- Due to the partial installation of the QuickBooks Desktop Application.
- Firewall and Internet settings are not done properly.
- The latest version of Digital Signatures is not there in Internet Explorer.
- The setup of Microsoft Internet Explorer is not done.
- Your PC is affected by a virus or exploit attack.
- Program files were damaged or corrupted.
Read more - Guide to Set Up and Run the Payroll in QuickBooks
Best Troubleshooting Methods to Fix QuickBooks Error 15223
We have seen above that when this error occurs and the causes behind it. Now. It’s time to look at the measures to fix this QuickBooks error 15223.
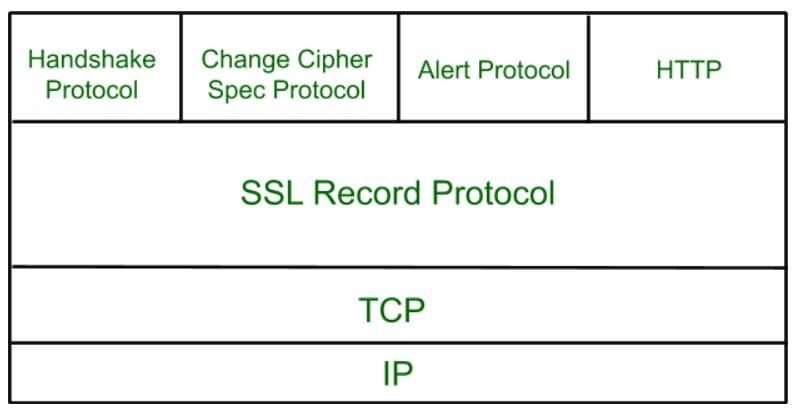
Method 1: SSL Layers Issue
SSL is a Secure Sockets Layer that checks the identities of your site to make sure of its authenticity. So to ensure that you need to follow the steps given below:
- Open Google Chrome and then choose the Settings icon.
- After that select Show Advanced settings.
- Click Change proxy below the Network option.
- Choose the Content tab and hit on Clear SSL state.
- Lastly, click OK and restart your Chrome.
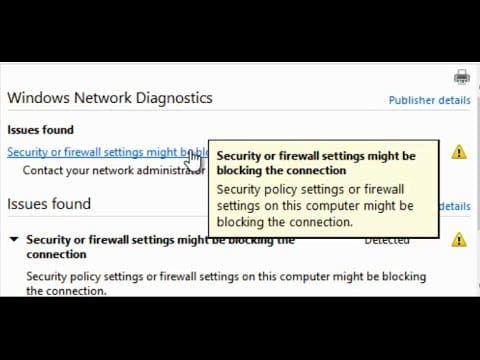
Method 2: Setting Up Antivirus and a Firewall
To keep your computer free from any malicious attack, you must configure firewall and antivirus settings. Here we have mentioned the procedure:
- Firstly go to the Windows Start option.
- Then enter Windows Firewall in the search box.
- After that select Advanced Settings and click on Inbound Rules.
- Choose Port and tap on Next.
- At last, make sure TCP is selected.
Method 3: TLS 1.0, TLS 1.1, and TLS 1.2 Verification
The main aim of TLS is to give you privacy and integrity and thus, verification of TLS is necessary. Here is how to verify all the TLS settings.
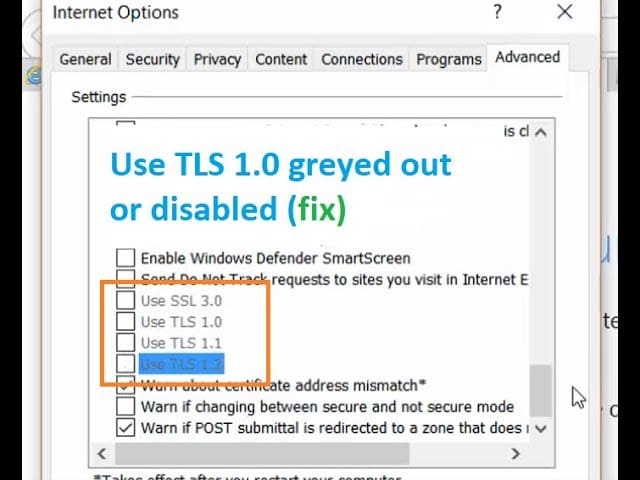
- Go to Internet Explorer and open it.
- Tap on Settings and select the Internet option.
- Choose the Advanced option and hit on Use TLS 1.0, Use TLS1.1, & Use TLS 1.2.
- Lastly, tick mark on Use TLS 1.0 and untick Use TLS 1.1 & Use TLS 1.2.
Method 4: Registering .dll Files
DLL is a Dynamic Link Library that contains small programs but you can load large programs also when needed. Follow these steps to register it:
- Click on Start and go running.
- After that type regsvr32 /s %SystemRoot%\system32\softpub.dll.
- Lastly, tap on OK and you will get a confirmation message.
Read more - How to use Manual payroll in QuickBooks?
Method 5: Use Windows Clean Boot
Clean boot allows you to only open the important files that you need and close all other apps running in the background. So, follow the steps below to carry out the Clean Boot in Windows.
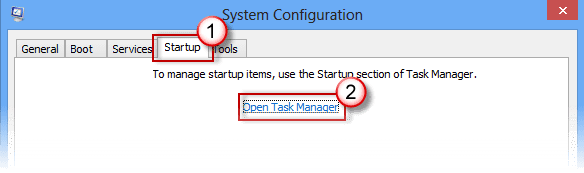
- Hold Windows + R and open the Run box.
- Then write msconfig and click OK.
- Select Selective Startup on the general tab and clear the Load startup.
- Now choose the Services option and hide the all Microsoft services check box.
- Lastly, Disable all and hit on the Startup tab.
Conclusion
We hope that the corrective methods stated above will help you to understand and resolve installation and update errors in QuickBooks error 15223. Additionally, you won’t run into this problem in the future. If you have any other questions about an issue of any kind, get in touch with us.
Frequently Asked Questions (FAQs)
Q1. How to fix an unexpected error in QuickBooks?
Answer – Follow these easy steps to get rid of this unexpected error in QBs:
- Choose the File option at the top.
- Click Utilities from the drop-down menu.
- Select Rebuild Data and at last hit Ok.
Q2. What is a QuickBooks Error Code 15223?
Answer – This error arises when you are installing QBs Desktop and want to update your Payroll.