
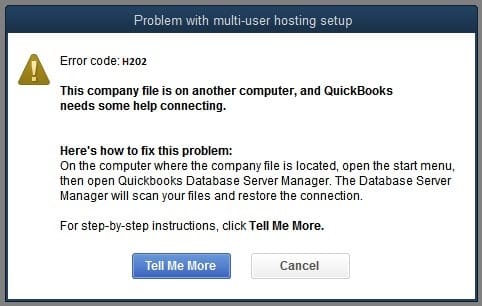
QuickBooks error H202 occurs when you switch QuickBooks to multi-user mode. The error indicates an inability to communicate with the server. That means the server used for storing the company files (QBW) is blocked. This prevents the user to access the company files on the workstation.
What is QuickBooks Error H202
Multi-user mode enables the connection between server and workstations. When the connection gets lost it results in QuickBooks error code H202. That is also the reason for knowing this error as a multi-user switching error.
You receive this error while opening a QuickBooks file in a multi-user environment. The server connects to other workstations on the same network. Workstations use the network to access the file located on the server. However, the error takes place due to different reasons and occasions. You can learn about them in the section below:-
Factors responsible for QuickBooks Error Code H202
Several factors are responsible for the QuickBooks error H202. Like:-
- Inappropriate configuration of the DNS setting.
- QuickBooksDBXX and QBCFMonitor are not running.
- The firewall is blocking the path of exchanging QB data
- Corrupted .nd file
- QuickBooks database server manager has some problems
- QuickBooks desktop has not saved the IP address of the host or server.
- Hosting settings is inappropriate
Symptoms of Quickbooks Error H202
- It is not possible to switch to multi-user mode.
- It is impossible to open a company file on a different computer.
- The QuickBooks error message H202 appears on your computer’s screen.
- QuickBooks has become slow, and sometimes it freezes or stops after a couple of seconds when you use it.
- Your windows computer is getting slow.
Solutions to fix QuickBooks Error H202
You can move into the section below for more information on how to resolve this issue after reviewing the full list of solutions:-
Solution 1: Ping your Server from a Workstation
The user needs to ping your server from a workstation to examine the connection. Also, from all workstations that occur Error H202.
Step 1: Enable Network Discovery on Server
- To initiate, open the Server and workstations.
- Then, access the Windows start menu.
- Click on the Search panel and enter Network.
- Thereafter, double-click on Network and Sharing Center.
- Tap Change advanced sharing settings.
- Navigate towards the Network Discovery and File and Printer sharing tab.
- Also, you need to select Turn on Network discovery.
Step 2: Pick Server name from the Server
- Open the Server.
- Then, pick the Windows Start menu.
- Consequently, access the Run window.
- Enter CMD there.
- Hit Enter.
- Open the CMD window and enter ipconfig/all.
- Again, hit Enter.
- Try to go through the Windows IP configuration and find out the hostname.
- After that, you will find the server name on the right.
- Now, just note down the hostname.
- You can also copy them to a notepad or word document.
Step 3: Examine Network Connectivity
- Open the Run window.
- Thereafter, enter CMD there.
- Hit OK.
- Try to ping the server.
- Also, type ping_server name.
- Again, hit Enter.
- Conduct the same steps on each system corrupting with error.
- If there are some issues then try to repair the network.
Solution 2: Run QuickBooks file doctor
- Visit the official site of Intuit.
- There, try to locate the official download link for the QuickBooks tool hub.
- Make sure to download it.
- Save the downloaded file where you can find it easily.
- Also, launch the same to commence with the installation procedure.
- Once done, you need to agree to the terms and conditions.
- After completing the installation, just open the tool hub.
- Navigate towards the Company file Issues tab.
- Thereafter, choose Run QuickBooks file doctor.
- Go to the drop-down menu to pick the company file.
- If you cannot find it then choose the Browse option.
- Also, checkmark the box of the file.
- Tap Continue.
- Later, specify the QuickBooks admin password.
- Hit next when prompted.
- The scan will be started now.
- Just make sure that it can take longer than 5 minutes to scan all corrupted QB folders.
- After finding the issue, you are only required to restart the system.
Solution 3: Verify QuickBooks Services
The steps will you to enable the multi-user mode when a full version of QuickBooks is running.
- Open the server system.
- Thereafter, just access QuickBooks.
- Click file.
- Then, choose Utilities.
- Subsequently, choose Host multi-user access.
Now, you need to verify the status of QBCFMonitorService and QuickbooksDBXX. For that, follow some more steps:-
- Access the Run window.
- Enter services.msc now.
- Also, choose OK.
- Later, choose QuickBooksDBXX.
- Make sure that you set the Startup type as Automatic.
- Then, ensure that the Service status is running.
- Navigate towards the Recovery option.
- Click on the same.
- Head towards the drop-down menus for first, second, and subsequent failures.
- Subsequently, pick Restart the service for all of them.
- Choose Apply and OK.
- After verifying the status of QuickBooksDBXX, it is recommended to do the same with QBCFMonitorService.
Solution 4: Go to the Windows Host file and Add Server
- The first and foremost step for you to do is to close the QuickBooks software.
- Now, navigate towards C:\Windows\System32\Drivers\Etc or C:\Windows\Syswow64\Drivers\Etc on the server.
- After that, perform a double-click on the host’s file.
- Also, pick the Notepad option.
- Thereafter, the user is required to specify the following accordingly.
- Server: IP and name of the computer
- Computer: IP of server and name of the computer.
- Instead of using a space key, try to hit the tab button for segregating.
- Just access the software in multi-user mode.
- Finally, just examine the issue.
Solution 5: Run QuickBooks Database Server Manager
- Initiate the procedure by expanding the Windows Start menu.
- Fill up the database there.
- Choose QuickBooks database server manager when appeared within the list.
- Just pick the folder which is used for locating company files.
- If want then uses the Browse button as well.
- Hit the Start Scan tab.
- Thereafter, try to resolve the firewall settings with QBDBSM.
- Hit Close once the scanning procedure gets completed.
- Open all workstations that bring the QuickBooks error H202.
- After that, access QuickBooks there.
- Pick the File menu to choose Switch to multi-user mode.
- Just check whether you can use the software in a multi-user environment or not.
- If not then move towards the next solution.
Solution 6: System Firewall Configuration
- To begin with, move towards the settings of the system firewall.
- Try to create exceptions there.
- Then, modify the firewall preference and permission.
- Open all the computers.
- Also, open your QuickBooks software.
- Head towards the File menu.
- Consequently, select Switch to multi-user mode.
Solution 7: Run QuickBooks Install Diagnostic Tool
- Firstly, just open the QuickBooks tool hub.
- Hit the Installation issues tab.
- Thereafter, pick QuickBooks install diagnostic tool button.
- Try to scan the folder where you have saved the data file.
- Then, specify the network interfaces and IP addresses.
- Make sure to enable the ports if the firewall status section has any.
- After that, just examine the data file connectivity.
- Just access the QB file and check the issue.
Solution 8: Create a new folder for QuickBooks
- Open the server.
- Create a new folder there.
- Thereafter, you need to modify the permissions for the newly made folder.
- Also, do the same for the folder that you want to use for sharing the QuickBooks files.
- Just copy the .qbw file.
- Paste the same to this folder.
- Finally, access the QB file in a multi-user environment.
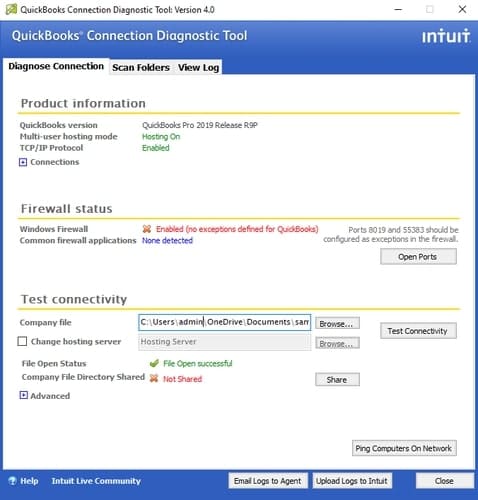
Solution 9: Run QuickBooks connection diagnostic tool
 Just update QuickBooks to its newest release after considering these steps.
- To initiate, download and install the QuickBooks connection diagnostic tool. After that, just scan the folder where you have saved the QB files.
- Consequently, specify the IP address that occurs when you run the tool.
- Try to conduct the configuration of firewall ports.
- Go through the instructions that appeared on your device.
- Finally, just access the file that brings QuickBooks error H202.
Solution 10: Rename .TLG and .ND files
- Initially, close QuickBooks.
- Access the server and open the company file folder.
- Then, click on the .tlg file.
- Perform a right-click on the same and hit Rename button.
- Just old at the end of the file name.
- Then, hit Enter.
- Now, try to rename the .nd file with the same procedure.
- Meanwhile, new .nd and .tlg files will be created when the database server runs on your device.
- Access the file.
- Hit the Alt key continuously till the file gets opened.
- The error has been fixed now.
Solution 11: Open Windows Control Panel
- Close the QuickBooks on every system.
- Then, open the windows control panel.
- Click on the Programs and features button.
- Thereafter, you need to select QuickBooks.
- Also, go through the list of installed programs.
- Select the Change and Repair option from there.
- After that, you need to allow the positive options.
Solution 12: Modify the Company file Location
- Initially, the user needs to make a folder on Drive C:
- Then, click on the company file .TLG.
- Make sure to copy these files.
- Navigate to the newly created file folder.
- Paste your file there.
- Also, open your file in a multi-user environment.
Conclusion
Using QuickBooks can make your work way easier, but troubling its error is the most common thing every QuickBooks user encounters. Well, the most common error is QuickBooks Error H202. In the above guide, we have provided you with the top 11 solutions for eliminating the error. You can try them one by one and check what works for you.If you are still left with any doubts, then you can connect with us anytime.
Frequently Asked Questions (FAQs)
Question 1: What does the QuickBooks error H202 indicate?
Answer: The H202 QuickBooks error indicates the issue within the network server. You face it at the time of accessing QuickBooks in multi-user mode. The main reason behind this issue is the blocked firewall and wrongly configured settings.
Question 2: Can you list down the H series errors in QuickBooks?
Answer: Error codes such as H101, H202, H303, and H505 all represent the H series or hosting errors in QuickBooks. If you are receiving it then try to configure multi-user settings. This will help in resolving the error issues.
Question 3: How to fix QuickBooks Error H303?
Answer: You can fix the issue by conducting any of these solutions:-
- Modify the firewall settings.
- Also, change the company file path.
- Run QuickBooks file doctor.
Question 4: What are the reasons behind QuickBooks Error H202?
Answer: Different reasons behind QuickBooks H202:-
- QuickBooks installation gets damaged.
- The firewall is not set up appropriately.
- The hosting configuration is wrong.
- Improper work of QuickBooks services.
Question 5: Can I resolve QuickBooks error H101?
Answer: Yes, you can easily resolve QuickBooks error H101 by applying these solutions:-
- Examine the QuickBooks hosting.
- Verify the QuickBooks services.
- Create a new company file folder.